The Adventures of Stransky & Steiner - Book 2 - Bretonnia
The second stop on the adventure is to Bretonnia. My own army was only about 1,000 points so I was going to be limited with what I could play, but then my buddy Tim decided it was time to unload his army and sent it to me. Before putting much of it on EBAY, I thought it would be cool for one final hurrah with his Bretonnians vs. my Empire. Thus, a normal sized battle was born.
The Scenario: Fighting Withdrawal
Another
Flames of War scenario, this one called for the defender (Bretonnia) placing 1
objective and the attacker (Empire) placing two in a zone on the Bretonnian
side. The Bretonnians would set up
first, but could hold one unit off in ambush (if it was possible based on the
terrain). If they couldn’t place a unit
at least 16” from an Empire unit and out of line of sight, the ambushing unit
would have to enter from the back of their table edge.
The trick
of this battle is that the Bretonnians will gradually start removing units from
the table as they withdraw. They’re not
worth any Victory Points, nor are the objectives. The removed units just give the Empire fewer
units to destroy. Capturing an objective
will end the game, but they weren’t worth any VP either. So, the idea for the Empire was to chalk up
some VP as early as possible without losing too much, then ending the game.
I couldn’t
decide if the withdrawal strategy for the Bretonnians would be to remove the
knights first (since they’re more valuable allowing fewer VP to the Empire) or
withdraw the men-at-arms first since the knights are harder to kill. I decided to play it by ear and see what
happens.
If no
objective is captured, the battle ends after the Empire Turn 8. The score is based solely on VP accumulated,
including bonus VP for the General, Battle Standard and captured unit standards.
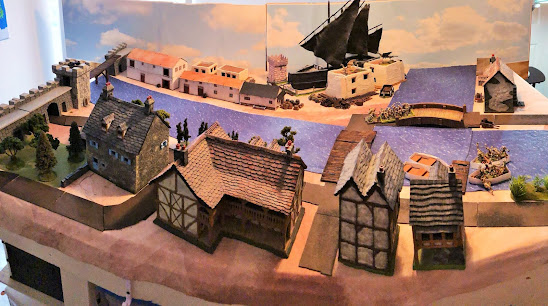
The Battlefield:

Deployment:
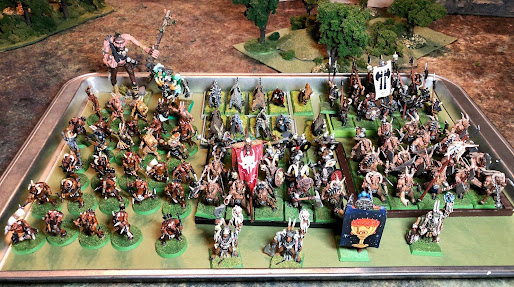
Based on Tim’s guidance, the Bretonnian army is made up of two basic building blocks: Units of 10 peasant archers with defensive stakes, and blocks of 6 Knights of the Realm with full command. Some units have Damsels, which displace the knight in the middle of the second rank.


Tim called
this his “chariot army.” These are blocks of 6 knights that would charge like
chariots; two per opponent so that one could get a flank charge. The strategy
was to sit back and let the enemy come with the archers and trebuchet firing on
them, then charging when the time was right.
Since the Empire’s objective was to attack and capture the objectives
early, this seemed like a strategy that would work here.


They
consisted of a mortar, 20 swordsmen, 20 halberdiers, the Helblaster Volley Gun,
10 Handgunners and 2 units of Pistoliers led by Corporal Kruger, who advanced
in the last battle. Each of the infantry units had a detachment of 5 Free
Company as a screen in front.
Captain
Stransky on his warhorse with Dragon Bow set up behind the handgunners. Steiner
had been demoted to a level 2 wizard with the Lore of Metal for this battle and
deployed next to the handgunners. Magier
Brandt was added to the army to diversify the magical attacks. He is a level 2
Lore of Beasts wizard deployed in the front rank of the halberdiers.
Critically,
I forgot to deploy Captain Kiesel on his Pegasus (the model was still out in
the display case), so the army would be short-handed until I remembered to
bring him on in Turn 2.
Turn 1:
It was a
general advance for the Empire across the board with all units marching forward
except for the halberdiers and swordsmen who wanted a bigger gap between them
and their screen of free company. The
Hunters formed a line to lure the knights toward the corner and away from the
battle line. In the magic phase, although the Empire had a 6-to-5 advantage,
Brandt didn’t have any useful spells and passed (HE should’ve had the Rod of
Power that stores dice, instead of Steiner, because he’ll pass a lot in this game!). Steiner’s one spell was easily dispelled. In
the shooting phase, both the mortar and the cannon misfired! Luckily, both were
minor with the crew forgetting to load them or something. The crossbowmen killed
1 men-at-arms archer across the battlefield and Capt. Stransky slayed a Grail
Knight with the Dragon Bow. Otherwise it was a terrible turn for dice with a
lot of 1’s and 2’s coming up for both sides.

On the far right, the knights
behind the woods came out around the outside of them and into their intended
position. The space directly behind the trees was one of the only spots on the
table where the ambush could be sprung.
With a magic advantage of 8-to-4 Lilian promptly miscast on her first
attempt. She rolled a 1 to wound, so she escaped the miscast unharmed, but it drained the magic
from the table and the phase ended. The archers were ineffective except for
dropping a free company man screening the swordsmen and the trebuchet fell
harmlessly between the free company and the swordsmen.
Turn 2:

The entire
Empire line advanced again with the White Wolf Knights closing on the
Bretonnian left. If the knights in the swamp choose not to charge, the White
Wolf Knights would have a rear charge, so it was to force them off the line.
The hunters lined up to get one final shot in before the Bretonnian knights
charged. It was here that I realized I’d forgotten to deploy Capt. Kiesel on
his Pegasus, so he flew in from the table edge and landed at the base of the
hill in front of the mortar looking for where he would be the most useful.
The magic
phase was 6-to-5, but with Brandt still not casting it amounted to a 3-to-5
disadvantage. What’s worse, Steiner Miscast taking a wound and immediately
ended the magic phase! In the shooting
phase, the Great Cannon misfired again; this time requiring an extra turn to
clear the muzzle and reload. That makes 2 miscasts and 3 misfires so far and
the troops haven’t even gotten into combat yet!
The mortar fared better, dropping a shell on the peasant bowmen in the
woods guarding the objective on the Bretonnian right. 4 were killed, but the General was close by to keep them in line. The crossbows dropped 2 peasant archers guarding the objective by the
swamp and Capt. Stransky dropped another Grail Knight, leaving only 2 to
accompany the General and Battle Standard.
 Handgunners,
their detachment and Steiner advancing on the fence line.
Handgunners,
their detachment and Steiner advancing on the fence line.For Bretonnia, the knights in the swamp charged the hunters whose bows were ineffective against their armor. It was a shame to sacrifice them, but getting that unit of knights off the line so I could get my White Wolf Knights on the nearby objective was vital. To thwart this, however, the knights on the wooded hill came out and turned to face the White Wolf Knights. What’s more, this opened the opportunity to deploy the one unit of ambush knights in the woods behind the first unit. They too were able to come down the wooded hill and face off against the White Wolf Knights.


With a
magic advantage of 8-to-4 Tristan lead off and killed 3 of Kruger’s pistoliers
with Master of the Wood. They passed their panic test, which would have run
them off the table and out of the game. Lilian attempted to cast The Wolf Hunts
on the knights that came off the hill so they could charge the White Wolf knights,
but the Empire used all of their dice to dispel it. This left Loreley with a
free attempt to cast it again, but she rolled a Miscast! She avoided taking any
wounds, but Steiner was able to cast a spell for free in response and there
were no remaining dice to dispel it. He cast Burning Iron on the unit of
knights next to Kruger, killing one. The
bad luck continued in the shooting phase with the Trebuchet promptly misfiring
and being out of service for at least one more turn. That’s 3 miscasts and 3
misfires in two complete turns. In
combat, the Bretonnian knights killed 3 of the hunters, handily winning the
combat, but the low die rolls continued as the hunters made a Hero roll for
their break test (snake eyes)! When would it end?
This was
an unplanned bonus since it would keep the knights in the swamp tied up for
another turn, even if I wouldn’t ever kill any of them (but with these dice,
who knows?)
Turn 3:

The Empire
battle line came as far forward as the fence with the free company detachments
for the swordsmen and halberdiers moving closer to the Bretonnian lines, daring
them to charge.

The Empire
still had 6 power dice to 5 Bretonnian dice. This time Magier Brandt cast
Bear’s Anger on himself in the front rank of the halberdiers since the
detachment had moved on ahead and combat could be imminent. Steiner’s spell was easily dispelled.

The mortar aimed for the trebuchet and dropped slightly short, killing one of the Bretonnian Knights in the process. Stransky’s Dragon bow continued with a perfect shooting score by felling another knight in the unit beside the woods.
The knight
unit in front of the trebuchet became the target for the Helblaster volley gun,
but all wounds were saved by either armor or the Ward Save from the Bretonnian
prayer to the Lady of the Lake.
With all
of those successful saves, it appeared that the dice were starting to roll high
(finally). The knights in the swamp made
quick work of the hunters, running them down as they fled off the table edge.
The White Wolf Knights found success by killing 2 Bretonnian knights. They
failed their break test and turned to flee but were run down by the White Wolf
knights before the White Wolf Knights collided corner-to-corner with the second
unit of Bretonnian knights nearby.
It looked
like the White Wolf Knights would suddenly have the opportunity to roll up the
line, so the defending Bretonnians had to adjust to counter them. The peasant
bowmen in front of the hill withdrew up the hill, permitting the unit of
knights beyond them to turn and face the White Wolf Knights. They didn’t
advance since they wanted to keep a distance if the White Wolf Knights pursued
through the second unit. I was suddenly realizing how vulnerable these small
“chariot” units of 6 knights were if they were charged by a unit capable of
getting through their armor.


What to do
about Kruger? The General opted to leave
what was left of the Grail Knights unit and picked a position between them and
the knights on the flank. The only way they could get out of a charge now would
be to round the group to the left. With the loss of a knight unit, it became
imperative that the Bretonnians needed to rack up some points so as not to lose
the battle. Kruger’s unit seemed an easy target.
Turn 4:

It was at
this time I realized that the last 2 moves from Corporal Kruger’s unit were
illegal. Both times I had march moved the Fast Cavalry within 8” of Bretonnian
units. Now I had to figure out how to remedy it. They hadn’t caused any damage
and had taken 3 casualties from Tristan’s Mastery of the Wood spell. I decided
the best choice of action was to back them around beside the Bretonnian unit on
the flank (where they’d been in the previous turn before moving around behind
the objective). They could make a legal move from there. I chose, instead, to
bring them around the front of the trees.
Because
the General and Grail unit had reconfigured responding to Kruger, I put that
unit back together where they’d been before the last move as well. Since the
Bretonnians were waiting for the Empire battle line to come within charge
range, and the Grail Knights wanted to get away from the Helblaster, it seemed
everything was in an acceptable position. (Kruger would be ineffective for the
rest of the battle anyway).
With
Lilian still off board, the Empire had a 6-to-4 magic advantage. Steiner
dropped his Bear’s Anger aspect to cast Oxen Stands and rallied the fleeing
free company. Brandt’s Burning Iron spell was dispelled and 2 dice were stored
in the Rod of Power.
In the
shooting phase, the mortar fell short of the trebuchet, but the cannon hit the
advanced unit of knights, killing one.


In the
Bretonnian turn, the fleeing knights next to the trebuchet rallied. The other
unit of knights who fled from the White Wolf Knights last turn failed to rally
and ran through the trebuchet on their way off the table with Loreley among
them. Luckily the trebuchet crew relied on their peasant duty and held their
position. The peasant bowmen who’d fled from the Pegasus on the hill also
rallied to face him once again. The half-strength unit of knights on the end of
the line crept forward to line up a charge on the Empire General, or the units
on the fence if Stransky moved away (which he likely would). The knights who’d pursued the hunters off the
table made their way back and started trudging through the swamp.
With Loreley gone and the Empire holding 2 dice in the Rod of Power, the magic phase was an even 6-to-6. Lilian had the Wolf Hunts spell, which would have allowed the Bretonnian knights next to the trebuchet to charge the White Wolf Knights, but she was in the swamp and out of range. Instead, she attempted casting Beast Cowers, which would hold them in place next turn, but it was dispelled. Tristan did what she could by casting Master of Wood and killing one of the White Wolf Knights.


At this point I realized I’d missed another key element of the game. Starting on Turn 3 the Bretonnians were to remove one unit from play (since the scenario was a Fighting Withdrawal, units should have been withdrawn at the start of the turn). After the mishap with Kruger and because it looked like the momentum was with the Empire, I just let it go and didn’t put back any casualties caused by the unit once I chose to remove it. But now, I had to choose two units.
I chose to
remove the peasant bowmen facing the Pegasus and the 2 remaining Grail Knights
in the unit with the General and Battle Standard Bearer. This prevented the
Empire from getting the VP for the full unit of Grail Knights and they were in
a precarious position opposite the Helblaster anyway.
Although
these withdrawn units didn’t grant VP to either side when they are taken off
the board, they do reduce the size of the army fighting which could make Route
tests at the beginning of the turn happen sooner. (Since this is a Flames of
War scenario, the Route Test is a morale check to see if the force withdraws
and concedes the victory once they are reduced below 50%).
Turn 5:

The
inevitable move was the White Wolf Knights charging the Bretonnian knights by
the trebuchet. The Halberdiers rallied before they even reached their free
company who’d fled before them. Most of the Empire army began marching forward,
except Captain Stransky who predictably withdrew to get away from the
encroaching Bretonnian knights. Captain
Kiesel on his Pegasus landed behind the Bretonnian knights in combat and Kruger
along with his remaining musician moved behind what was left of the knights on
the end of the Bretonnian line. I thought these were well positioned for when
the Bretonnians broke or fled, but then looked it up to find that a unit had to
be unit strength 5 to block and eliminate a fleeing opponent.
The magic
phase went quickly. With a 6-to-4 advantage, Steiner cast Bear’s Anger on
himself again and Burning Iron from Magier Brandt was dispelled. Two dice were
stored in the Rod of Power.
The cannon
and mortar fired on the knights coming through the swamp and both missed. The
Helblaster, however, unleashed a volley more intense than the previous one
(causing 30 hits!) which evaporated what was left of the knights on the end of
the battle line along with Tristan.

It was
getting near time to throw in the towel for the Bretonnians, however, I felt
that getting the General and Battle Standard to charge the White Wolf Knights might be enough to turn that combat. Defeating those knights might be
enough to move into a Draw.
The Bretonnians had to withdraw another unit, so this was the last peasant bowmen unit on the hill. The General and Battle Standard charged the White Wolf Knights (but didn’t get credit for charging a flank since they were less than unit strength 5) and the “Swamp Knights” were finally almost out. In retrospect, sending the knights in pursuit of the hunters was a bad idea. I should have sent the peasant bowmen and guarded the objective with the knights.
There was
still hope going into the magic phase. The Empire lost the 2 dice in the Rod of
Power so it was a 4-to-4 proposition. Lilian tried to cast Wolf Hunts on her
own unit of knights to get them out of the swamp and possibly charge the crossbowmen,
but it was dispelled.
The close
combat continued to be a comedy of errors. Neither side scored a single wound,
but this time the Bretonnians won combat by 1. The White Wolf Knights held.
Turn 6:

Capt.
Keisel on his Pegasus charged the rear of the Bretonnian knights. The rest of
the Empire line advanced, looking to throw more weight into the combat,
capture the unguarded objective and get in position to cut off the swamp
knights if they made it that far.
Magier
Brandt was finally able to change his spell selection and cast Transmutation of
Lead on the fighting Bretonnian knights. This caused them to have a -1 to hit,
to wound and to their saving throws. Hopefully this would be enough to swing
the combat.
The mortar
and cannon continued to miss the swamp knights. In the close combat phase,
Captain Kiesel and the Battle Standard Bearer exchanged wounds. The Bretonnians
won the combat by 1 again, and this time Captain Kiesel fled off the table edge
while the Bretonnians held. A small victory in the twilight of the game.
The
Bretonnians had to make their first Route roll and failed. This meant the army
was pulling back and the game was over.
The final score was Empire 1,213 to Bretonnia 313.
Debrief:

The
MVP unit of the battle were undoubtedly the Knights of the White Wolf, racking
up 2 units of Bretonnian Knights, one Damsel and capturing 2 banners. More
importantly, it was their success charging in from the flank that completely
disrupted the Bretonnian line and caused chaos for the rest of the battle.
Experience earned from the battle advanced their Initiative 1 point to a 4.
Although
happy with an Empire victory, I’m more disappointed in my performance with the
Bretonnians. I expected a closer game than this. I’ve only played one game with
Bretonnians before and it was 25 years ago (a resounding victory against a Wood
Elf player). So, the performance here shows how much work I have to do to be
able to field a respectable Bretonnian army. When the adventures of Stransky
& Steiner conclude, the Bretonnians are the next I will have to take on the
tour just to get some experience under my belt.
My biggest
mistake was that I over-estimated the defensive capability of the Bretonnian
Knights. With a Saving Throw of 2+ followed by a Ward save of 5/6+ I thought
they were rather impervious. At the same time, I under-estimated my White Wolf
Knights. After a lackluster performance against the Beastmen, I felt they
needed a little more punch so I made them Inner Circle Knights (Strength 4) and
gave them a banner that adds +d3” to their charge. When they went up against
that first Bretonnian knight unit, they were attacking with a Strength of 6 due
to their cavalry hammers. They continued to attack at Strength 5 even when they
weren’t charging. So, this was an eye-opener regarding them.
The
Helblaster also performed rather well. Historically, I never felt very
effective firing at long range and a Misfire always messed things up. I had two
misfires this game, but one happened on the last barrel of the first volley
(resulting in that barrel not contributing any shots) and a “Kaboom” result on
the next turn resulted in all 3 barrels firing with the full 10 shots each!
Obviously
I’m happy with the mix of the Empire army after this round. However, I had to make some adjustments for the Initiative 4 in the White Wolf unit. I dropped one of the knights, put one of the wizards on a barded warhorse and gave the other unit of Pistoliers a musician. On to the next battle, a road trip to
Cathay!

Comments
Post a Comment